

Anyone can do SUP yoga. It is not as intimidating as it looks.
Practicing yoga on a SUP improves your breathing and focus. Mindfulness and being present are skills you have to master for every pose. Yoga on land is fun on its own. But when you add SUP, it becomes an exercise that you can never get enough of. Besides, while losing balance on land can be frustrating, on a SUP it just means taking an exhilarating swim.
Check out these 17 awesome stand up paddle board yoga poses for all SUP yoga fanatics.
RELATED: What is the best yoga paddle board of 2024?
Key Takeaways
- Practicing yoga on a SUP improves your breathing and focus.
- Mindfulness and being present are skills you have to master for every pose.
- Yoga on land is fun on its own. But when you add SUP, it becomes an exercise that you can never get enough of.
- Besides, while losing balance on land can be frustrating, on a SUP it just means taking an exhilarating swim.
- Check out these 17 awesome stand up paddle board yoga poses for all SUP yoga fanatics.
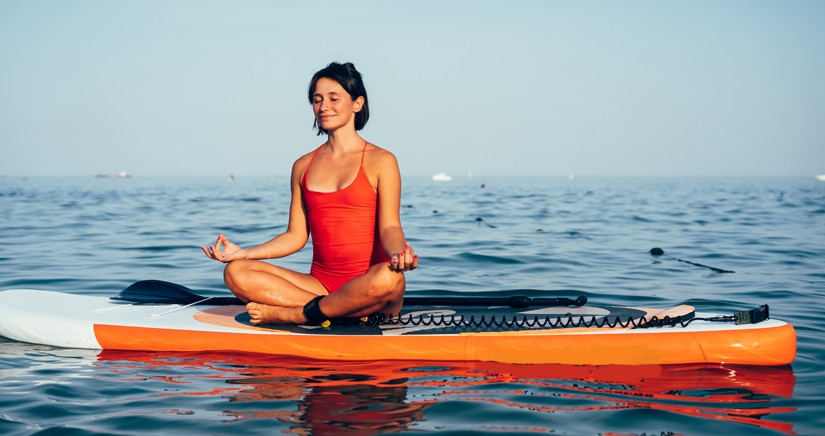
1. Seated Prayer SUP Yoga Pose
The seated prayer pose is great for starting your SUP yoga sessions. It is easy and helps you relax.
How to do it: sit on your stand up paddle board and cross your legs in front of you. Keep your back straight and your head upright, looking to the horizon. Place your hands on your knees or bring them to your chest in a prayer position. Slow down and release all the tension from your body. Focus on your breathing.
Benefits: the seated prayer pose relaxes your mind and body. It stretches the leg muscles, your hips, and back. Seeing as it is easy, you can use it to rest in between complex SUP yoga poses.
2. Downward Facing Dog
This is another simple SUP yoga pose for beginners and pros alike. You may have even tried it on land. When assuming this pose (and all the others here) on a paddle board, remember to do it calmly and mindfully. Sudden moves can end up with you taking a swim or hurting yourself.
How to do it: be on all fours. With your arms straight and hands shoulder-width apart, dig your toes into your stand up paddle board. Bring your hips up until your knees are straight. If you find it too difficult, you can bend the knees slightly. Hips should remain up with your tailbone facing the sky. If your wrists are under a lot of pressure, press your fingertips against the paddle board or make a fist.
Some people add to the challenge by pedaling their feet and moving the hips up and down. You can do it as well if you feel comfortable enough.
Benefits: the downward facing dog gives you a good stretch from your feet to the hamstrings. It strengthens the shoulder and arm muscles and offers back therapy.
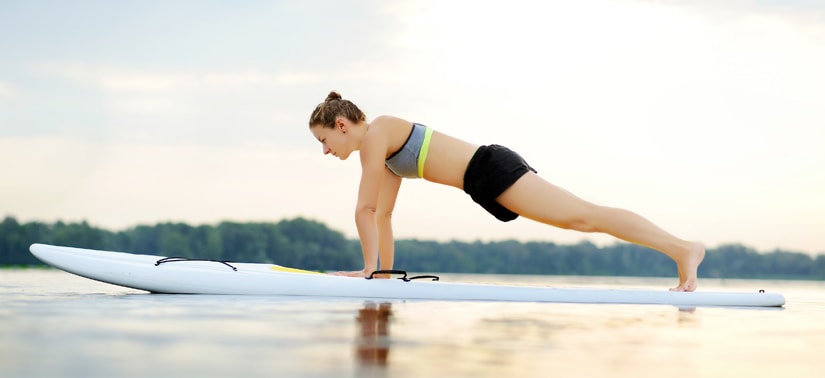
3. Plank Yoga SUP Pose
Everyone desires a strong core—and you can achieve that with the plank pose. Doing it on a stand up paddle board is much more difficult, and that is exactly what you want.
How to do it: if you are moving from the downward dog, point your heels towards the sky. Roll out your spine to a straight position. Alternatively, you can begin on all fours, then straighten your legs behind you. Keep your toes on the stand up paddle board and your heels pointed up. To add some fun to it, twist your hips from side to side. Remember to dig your toes into the paddle board. You will feel the burn.
Regardless of how bad you want to have toned abs, pay attention to your wrists. You don’t want to hold the SUP yoga pose too long and strain them.
Benefits: the most obvious benefit is a strengthened core and abs of steel—that is, if you’re consistent. Your arms and legs will be engaged too. That means toned muscles and increased strength.
4. Child Paddle Board Yoga Pose
Many people use the child pose as a resting pose. But you can hold it for a while (as long as you hold other SUP yoga poses) because it helps your body in several ways.
How to do it: start on all fours. Arch you back, pushing your bottom upwards. Keep your arms straight. Now push your hips back and sit on your heels. Stretch your hands in front of you and touch the stand up paddle board with your forehead. Your torso should be resting on your thighs. This is a comfortable pose that feels amazing.
Benefits: the child’s pose relieves bloating. It is one of the SUP yoga poses that massage your abdomen and help with digestion. It gives the back a nice relaxing stretch and stretches the rest of the lower body too. When you assume the pose, you will notice that your mind relaxes. This is because the child’s pose is known to have a relaxing effect. You will appreciate it if you’ve had a lot of stressful thoughts.
5. Crescent Lunge SUP Yoga Pose
A simple but slightly challenging pose. The crescent lunge will tell whether your balancing needs improvement.
How to do it: start on all fours on your stand up paddle board. Bring out one leg such that the foot is flat on the stand up paddle board and the knee is at a 90-degree angle. The other leg should be stretched out on the paddle board behind you. Use your hands to help you stay balanced as you get into the SUP yoga pose. Once you are settled, extend your hands in front of you and stretch them upwards. If you can, make your palms touch. Take it a step further by leaning back. Hold for a while and then change legs.
Benefits: the crescent lunge opens up your shoulders and, consequently, your chest. It allows your legs and hips to stretch. Stability on land is already difficult and it is much harder on water. Once you master it, your balance will greatly improve. It strengthens the glutes, legs, and arm muscles too.
6. Triangle Pose
Many paddlers will shy away from the triangle pose. Getting into it, especially for beginners, can land you in the water. But you should try it anyway. If you fail the first time, do it again.
How to do it: start with the downward facing dog. Bring your right foot to the center of the SUP, between your hands. Twist your left foot so it steps flat on the board and the toes face towards the left side (outwards). You can bend your right knee to maintain balance. Once you are steady, extend the knee. Straighten your arms, then raise the left arm. Continue facing the paddle board until you are steady and confident enough to face the left side.
Benefits: the triangle pose gives a good stretch on your spine, arms, and legs. It opens up your shoulders and chest as well. The engaged muscles, the legs, back, arms, and core, are strengthened and toned. It is a calming pose that helps clear your head, in addition to enhancing flexibility.
7. Warrior 1 SUP Yoga Pose
The Warrior 1 pose requires skill, especially when it comes to stability. To do it right, you need to pay attention to every detail, especially foot placement on the paddle board.
How to do it: start with the downward dog. Step one foot forward on the paddle board between your hands. If you want to maximize stability, move the right foot a little to the right and the left foot a little to the left. Weight distribution helps with balance. The feet should be stepping firmly on the SUP surface. Have the knee at the front at a 90-degree angle and then stand. Once you are stable enough, lift your arms straight towards the sky.
Benefits: the Warrior 1 pose opens up your hips and chest. It stretches your legs, torso, and arms. The most remarkable benefit is the enhancement of balance and endurance. And because of how keen you have to be, it improves mindfulness and calmness. It tones your legs and arm muscles too.
8. Warrior 2 Paddle Board Yoga Pose
The warrior 2 pose is not very different from the warrior 1. The level of difficulty is pretty much the same.
How to do it: start by standing at a balanced spot, in front of the center carry handle. Move your feet outwards. Bend forward slowly and touch the paddle board with your hands. You can part your feet more for stability. Straighten your arms so you are touching the board surface with your fingertips. Step your left foot far back until the knee is straight and the heel is lifted. Keep your front knee at a 90-degree angle. Once you are comfortable, twist the back foot to make the toes point towards the side of the board. Lift your upper body. Stretch out your hands. The right one in front of you and the left one behind you. Look ahead.
Benefits: like the warrior 1, the warrior 2 opens up your hips and lungs. It gives your legs, arms, and thighs a nice stretch. You have to be completely present and this improves your focus and mindfulness. This paddleboard yoga pose builds endurance and strengthens your arms and legs. It is also believed to help with backaches.
ALSO READ: How hard is paddle board yoga?
9. Garland Pose (Malasana)
This is a SUP yoga pose that appears easy. But depending on the state of your knees, you may have some difficulties.
How to do it: stand straight on your paddle board with the center carry handle between your feet. Widen your feet for maximum balance. Point your toes outwards and your heels inwards. Slowly lower your hips. Keep your back straight and bring your hands to a praying position in front of you.
Benefits: the garland paddle board yoga pose will open up your groin and hips. It gives the leg muscles a really good workout. Make it a habit and you will have stronger knees and ankles. It also offers amazing lower back therapy and helps with digestion. Some people recommend it for pregnant women.
10. Chair Pose
When you are ready to make your legs and core do some real work, get into the chair SUP yoga pose.
How to do it: stand at the center of your paddleboard, where the carry handle is. Part your feet. Straighten your hands out in front of you and point them slightly upwards. Lower your hips to a sitting position. If you are finding it too hard, widen the distance between your feet again. And if it is not challenging enough, bring your feet closer together. Alternatively, start from the downward dog as shown in the video.
Benefits: you can tell by the burn you feel in your core and legs that they are getting stronger. It is one of the best SUP yoga poses for that. It makes your back as well as your ankles stronger. It is good for flat feet too.
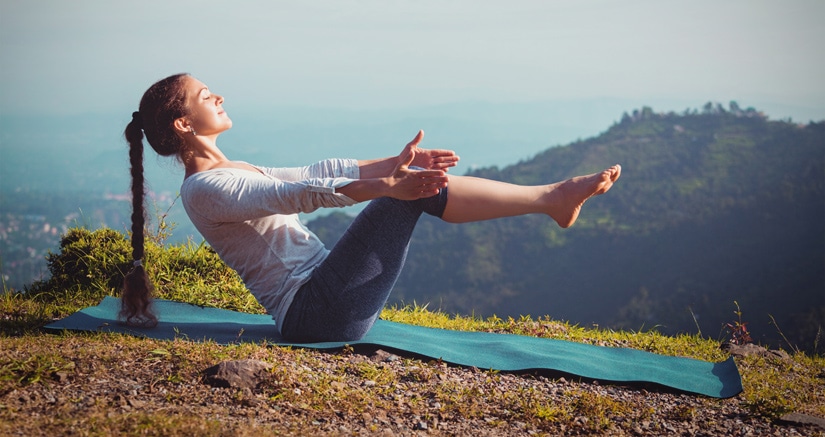
11. Boat SUP Yoga Pose
You need all the core strength you can get for SUP and other sports. So there’s no harm in adding another pose in your SUP yoga sequence that will give you just that.
How to do it: sit on the carry handle with your legs stretched out. Lift your legs, keep your back straight and then stretch out your arms in front of you. Feel free to bend your knees if it feels too hard. But if you want it to be more challenging, lift your hands straight and point them towards the sky and straighten your legs.
Benefits: the back, core, and hips work extremely hard in this pose. As a result, they are strengthened and learn to become steady. The abdomen is engaged and this will aid digestion. For many people, the boat pose is a stress reliever.
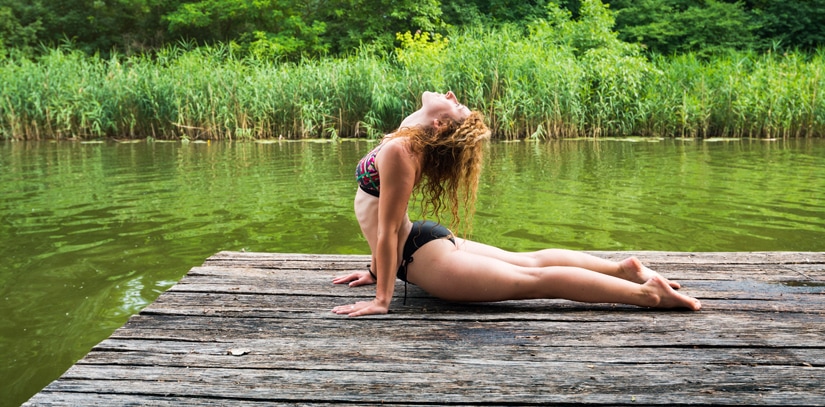
12. Cobra Pose
Otherwise known as the upward facing dog, the cobra won’t give you a problem with balancing. It is a perfect stretching exercise.
How to do it: start by lying on your stomach. Place your hands beneath your shoulders. Raise your torso slowly as you straighten your arms and bring your elbows towards your body. Your legs and knees should be lying flat on your paddleboard.
Benefits: as you can guess, this pose stretches your back and gives it strength. Your shoulder and torso also get a much-needed stretch and your chest opens up. The more you do the cobra pose, the more your spine becomes flexible.
13. Table Top Pose
A majority of beginners will find it hard to get into most of the SUP yoga poses mentioned here. If that is you, here is a beginner-friendly one. You can also use it to transition from one pose to another.
How to do it: starting from the sitting pose, lean forward and touch the stand up paddle board with your hands. Place the knees on the paddle board and move them back. Your navel should be almost directly above the carry handle. Remember to keep your back, arms, and thighs straight. You can add the inhaling exercises shown in the video.
Benefits: the table top relaxes your spine and lower back. It teaches you how to be calm and balance your weight. It stretches just about every part of your body lightly.
14. Bridge Pose
After sitting on a chair the whole day, make sure you try out the bridge pose. It is a stretching paddle board yoga pose that has a calming effect.
How to do it: lie down on your back. Take in the sky for a second then bend your knees. With your feet flat on the board, start moving them towards you. Have them touch your sit bone. Begin lifting your hips as high as you can. Bring your hands and shoulders under you. Hold your hands together.
Benefits: the bridge pose stretches your abdomen, spine, neck, and shoulders. It opens up your chest. It works the glutes and hamstrings. When done right, it has a positive effect on your digestion. It is very easy to let go of tension while in this pose.
15. Full Wheel Pose
Another calming pose that will make you happier. The wheel pose is the best if you have been dealing with a lot of stress and anxiety lately.
How to do it: lie down on your paddle board. Bend your knees bring your feet close to your sit bone. Place your hands on either side of your head. Rotate them such that your fingers are pointing at your feet. Lift your hips slowly and steadily until your arms are completely straight. If you are having trouble, try to do it as shown in the video.
Benefits: the full wheel pose stretches the front of your body. It opens up your lungs and chest. It will give you stronger glutes, spine, legs, and wrists. As already mentioned, it will make you happier because it clears your head and brightens your mood.
16. Tree Pose
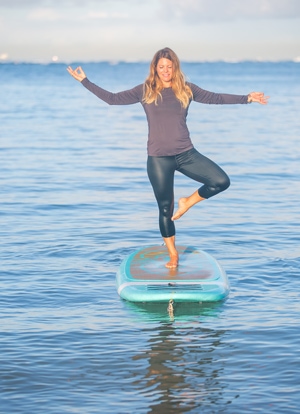
It may be a basic SUP yoga pose, but on a stand up paddle board, it becomes tricky. You should be prepared to fall in while attempting this one.
How to do it: stand at the center of your paddle board. Keep the foot you want to stand on aligned with the center handle—just in front or behind the carry handle. Stretch out your hands to your sides for balance.
Lift your foot and see if you can balance. Keep lifting it then place your sole against the ankle of the standing foot. Depending on how confident you feel, bring it up to your knee. Let your arms stay stretched or bring them to a prayer position.
Benefits: the tree pose strengthens and tons your leg muscles, from the ankles to the thighs. It stretches your body and enhances balance. The pose is recommended for sciatica and flat feet.
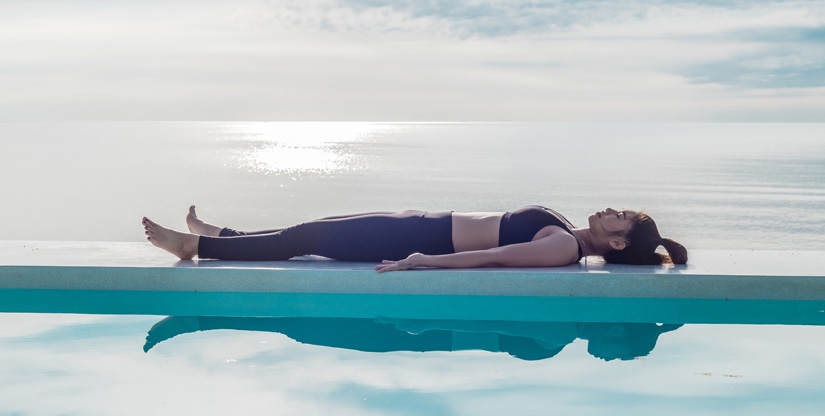
17. Corpse Pose
Last but not least, we have the corpse pose, also known as Savasana. The most relaxing and energizing of them all. Make it the last pose of your sessions.
How to do it: lie on your back with your feet stretched out. Place your hands on either side of your body and just float. You can let your legs and arms hang on either side of the paddle board into the water.
Benefits: the Savasana has a positive effect on your mental health. It minimizes fatigue and releases tension from the body. It lowers blood pressure and can help with insomnia.
Important: some of these SUP yoga poses may be strenuous. If you are pregnant or have any issues, clear with your doctor first.
Conclusion
YOU MAY ALSO LIKE: What to wear for paddle board yoga or SUP Yoga: What to Do with the Paddle
Doing paddle board yoga is one of the most exciting activities you can ever take part in. And the SUP yoga poses discussed above will help you transform into a new version of yourself—one that is healthier and happier.
Which SUP yoga pose is your favorite? Share with us in the comments.